(640x480, 872k) octatrap.zip
(16k)
| www.delorie.com/quake3/octatrap/ | search |
|
(640x480, 872k) octatrap.zip (16k) |
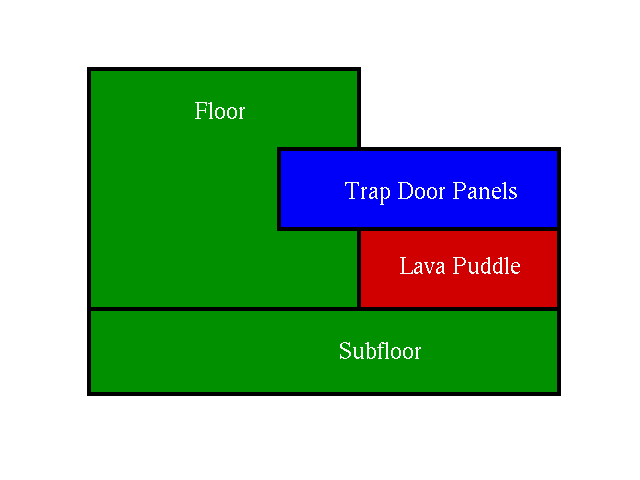
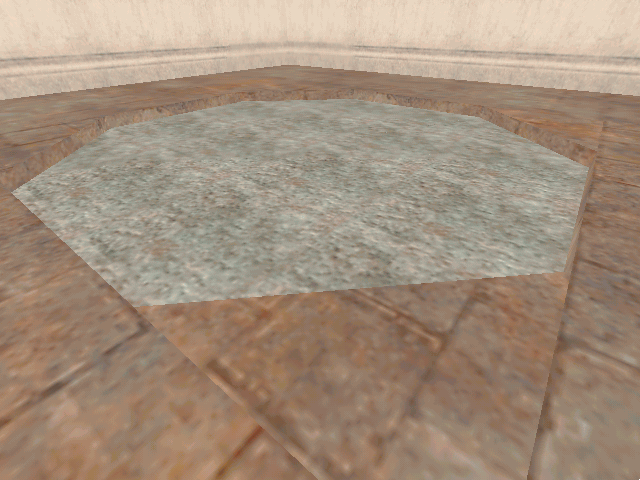
This type of door can be used for both floor traps and ceiling openings (say, triggered elsewhere, but placed over a jump pad, so you have to open the door before you can jump up through it). Floor traps can cover lava, deep pits, rooms, or shallow pits with weapons, ammo, or powerups in them.
One rule I always follow - make sure all your corners are on grid points, and put them there yourself! I often hand-move corners to exactly where I want them, and this tutorial will include some of that. If you haven't already, create a 512 by 512 by 192 high room (create a brush and hollow it, apply pretty textures) to work in. Create an info_player_deathmatch in the corner, facing in.
| ||
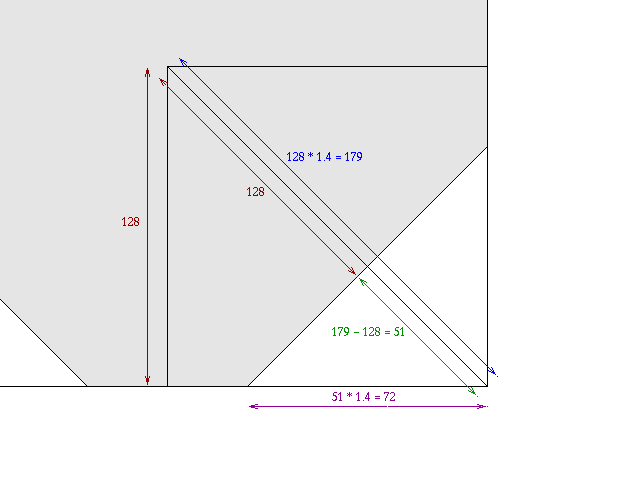
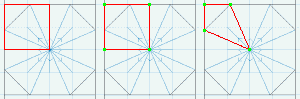
Since our opening is 256 units across, the octagon has a 128 unit "radius" (red in the picture). Based on that, we calculate it's 179 units from the center to the corner of the bounding square (128 * 1.4, blue). This is 51 units beyond the 128 unit radius (179 - 128, green), so the distance from the bounding box corner to the octagon's corner is 51 * 1.4 = 72 units (purple).
| |||
| ||
| ||
| ||
The next step is to select all eight door panels, and apply the right texture if you haven't already. Do all the scaling, rotating, or whatever you need to do now, because it gets a lot harder after the brushes are converted to func_doors.
Now convert them to func_doors. You have to select each of the eight panels one at a time - select, right click, select func->func_door, 'N' to bring up the attribute dialog, select the appropriate direction. Remember that the panel moves away from the center, so choose the direction pointing in that direction. You also need to create a key/value pair for targetname (I use "door1" but each door assembly needs its own unique name), team (same as targetname), speed (20 is grindingly slow, 300 is normal/fast), "wait" if you want, and "lip". The last one is tricky.
"Lip" is how much of the doors remain visible after they open. We don't want them visible at all, so I set the lips to "-8". Then I noticed that when the trap doors closed, the diagonals closed much later than the others - because "open" is based on the whole brush, so they open much farther back than the others. For the diagonal brushes, a little experimentation showed that "46" was the right value for those - that stops all the panels the same distance away from the middle, so that when they close they all hit the center at the same time.
If you try to select all the panels and set attributes all at once, they get changed back into non-doors and you have to start all over again.
Where you put your trigger depends on what your trap door is there for. For the purposes of this tutorial, I put it right over the door, but you might want it to be a button in a different room, or a small brush just over the center to trap an unwary player. Imagine a pusher brush in the doorway to the room which throws you to the center of the trap, which then opens quickly!
To create the trigger, first create a brush. Change the texture to common/nodraw ('S' for surface parms and type it into the text field). Bring up the attribute dialog ('N') and add a pair for "target" and "door1" (or whatever targetname you put on the doors). Next, calculate how long it will take the doors to open (example: a speed of 20 for a door 128 units long takes 128/20 = 6.4 seconds, round up to 7) and set that for the "wait" key. Otherwise, the door retriggers while it's opening and gets confused.
If you're using the trap door as a portal to another room, the trigger brush should extend through it to keep it from closing on you while you're on your way through (or set the door's wait high enough, and don't worry about slow players ;-). If you're using it as a trap, set the crusher attribute on the doors, or put the trigger elsewhere so a player in the door won't hold it open.
One variation I wanted was to have the trap open like a camera
shutter. To do this, each panel needs to move sideways, rather than
back, so add 90 degrees to all the angles. You'll have to adjust the
lips again. Remember that the lips are based on the bounding blocks,
not the brush shape, so the corner brushes move a total of 128 by
default. The map octatrap2 in the zip file (link at the top of this
page) shows the results. The trigger is the whole left side of the
room; climb the ramp to the observation platform for a good view.
| webmaster | delorie software privacy |
| Copyright © 2001 | Updated Feb 2001 |